Troubleshooting Windows Defender Advanced Threat Protection (WDATP) On-boarding

The blog describes some troubleshooting steps you can take if you have followed the process to on-board Windows 10 to WDATP (as described here), but the devices are not appearing in the Machine List on Windows Defender ATP portal

  1. From the Windows 10 device, verify the diagnostic data service is enabled and running

Open an elevated command prompt and run

sc qc diagtrack

In my case the service was running without errors

2. From the Windows 10 device, verify the on-boarding script ran successfully

Open the Application Event Log and look for Event ID 20

In my case the On-boarding script ran successfully

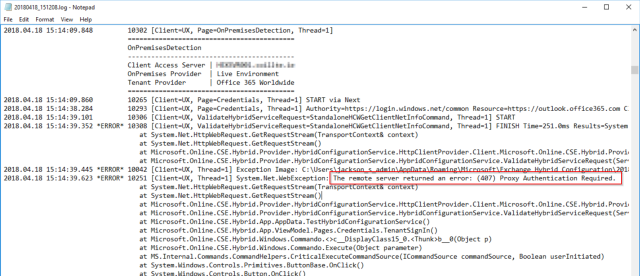
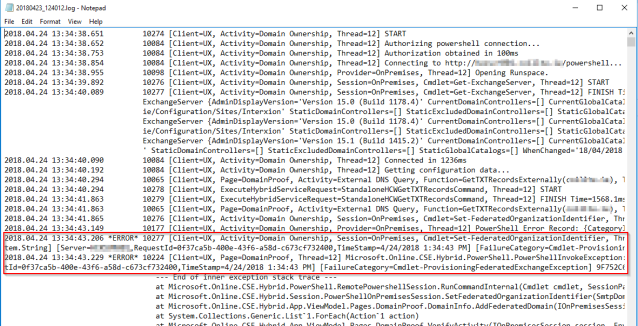
3. From the Windows 10 device, check the event logs for any on-boarding errors

Open the following event log and look for errors

  • Microsoft>Windows>SENSE>Operational

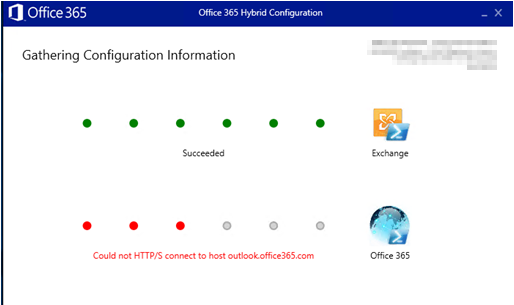
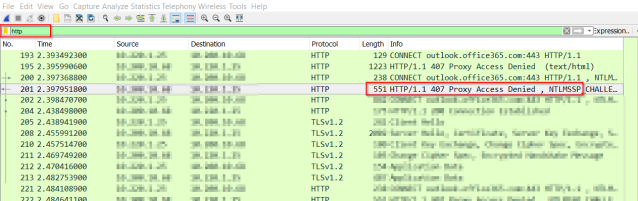
In my case I could see HTTP errors relating to Windows Defender ATP URL’s

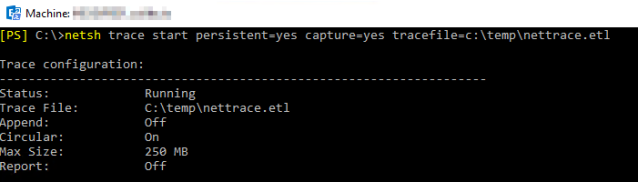
4. Next, run the WDATP Connectivity Analyzer tool to verify that your Windows 10 device can access the Windows Defender ATP URL’s

  • Windows Defender ATP clients need access to these URL’s
  • To verify access, download and extract the WDATP Connectivity Analyzer tool from here

Note about running the WDATP Connectivity Analyzer tool

The Widows Defender ATP sensor runs in system context using the LocalSystem account. Therefore, when running WDATP Connectivity Analyzer tool you need to run it in LocalSystem context.  The Sysinternals utility “PSExec.exe” can be used to achieve this.

On your Windows 10 client, open a command prompt and browse to the extracted WDATP Connectivity Analyzer folder

Run the following command

Psexec.exe –I –s cmd.exe

This will open another command prompt under the load system context. You can verify this using “whoami”

From this new command prompt (under the local system context) browse to the WDATP Connectivity Analyzer folder and run WDATPConnectivityAnalyzer.cmd

Once complete, review the log file (WDATPConnectivityAnalyzer.txt) that was generated in the WDATP Connectivity Analyzer folder

In my case I could see “403” errors connecting to the Widows Defender ATP URL’s. I consulted with the networks team who could see the internet proxy blocking the connections.  After the networks team created an exception for the URL’s I re-ran the connectivity tests.  The WDATP Connectivity Analyzer log showed a “200” (success)

Soon after, my Windows 10 devices started to appear in the Machine List in the Windows Defender ATP portal

On-board Devices to Windows Defender Advanced Threat Protection (WDATP)

This blog describes steps required to on-board a device onto Windows Defender Advanced Threat Protection (WDATP), and how to verify the on-boarding was successfully.

On-boarding

  1. Sign into the Windows Defender ATP Portal here
    1. You can sign up for a trial here
    2. If you get an error logging in, make sure that you’re using an ‘inPrivate’ or ‘incognito’ window in your browser
  2. Select “On-board your first machine”
  3. Select your operating system version, deployment method and download the associated package. (In my case I’m on-boarding a Windows 10 device and using a Local Script – for large scale rollouts use one of the other deployment methods)
  4. Copy and extract the package onto your Windows 10 client
  5. From an elevated command prompt (i.e. run as administrator), run the extracted script
  6. The client has now been on-boarded to Windows Defender ATP

Verify

  1. Go back to the Windows Defender Security Centre and copy the detection test script onto the Windows 10 client
  2. On the Windows 10 client run the script from an elevated command prompt
  3. Return to the Windows Defender ATP dashboard, and open the Machines List
  4. After a few minutes your computer should appear in the list


Congratulations you have on-boarded a device onto Windows Defender ATP


How to report on licensed Office 365 users with disabled Active Directory accounts

There may be times where you need to do some housekeeping on your Office 365 licenses.  Users may have left, for example, had their active directory accounts disabled, but are still consuming a license in Office 365.  Here is a simple powershell one-line that will output a report to CSV.

Connect powershell to Azure AD for your Office 365 subscription as described here and run the following

Get-MsolUser -All -EnabledFilter DisabledOnly | where {$_.isLicensed -eq $true} | select DisplayName,UserPrincipalName,BlockCredential,Islicensed | Export-Csv c:\temp\licensereport.csv -NoTypeInformation


This will give you a report on all licensed Office 365 users with disabled active directory accounts.


How to update a Dynamic Distribution Group Recipient Filter

During an Office 365 / Exchange Online migration, you may have a requirement to update the recipient filter of any dynamic distribution group.

In my case, I needed to do this because the dynamic distribution group used filters to include only mailboxes. But mailboxes that are migrated to Office 365 become mail-enabled users in the on-premises directory. This can cause issues with certain members of a dynamic distribution group not receiving email messages. The issue is described here

The process is quite simple… using the Set-DynamicDistributionGroup to update the recipient filter to include the MailUser and MailContact.  What can be tricky however is getting the syntax correct.

The following is an example of the process and syntax I used to update a Dynamic Distribution Group to include mail enabled users:

  1. First, I got the original recipient filter details but running the following command

Get-DynamicDistributionGroup -Identity DDGName  |fl RecipientFilter

  1. I then took a copy of the original recipient filter which was as follows:

“((((RecipientType -eq ‘UserMailbox’) -and (((MemberOfGroup -eq ‘CN=grpUsers1,OU=Domain Groups,DC=domain,DC=ie’) -or (MemberOfGroup -eq ‘CN=grpUsers2,OU=Domain Groups,DC=domain,DC=ie’))))) -and (-not(Name -like ‘SystemMailbox{*’)) -and (-not(Name -like ‘CAS_{*’)))”

  1. I then added the MailUser and MailContact recipient type (highlighted in bold) to the recipient filter and used the Set-DynamicDistributionGroup with the following syntax to update the recipient filter:

Set-DynamicDistributionGroup -identity “DDGName” -RecipientFilter “((((RecipientType -eq ‘UserMailbox’) -or (RecipientType -eq ‘MailUser’) -or (RecipientType -eq ‘MailContact’) -and (((MemberOfGroup -eq ‘CN=grpUsers1,OU=Domain Groups,DC=domain,DC=ie’) -or (MemberOfGroup -eq ‘CN=grpUsers2,OU=Domain Groups,DC=domain,DC=ie’))))) -and (-not(Name -like ‘SystemMailbox{*’)) -and (-not(Name -like ‘CAS_{*’)))”


Azure AD Connect unable to sync built-in Administrator account

In a recent project I came across a scenario where there was a requirement to synchronize the built-in Administrator account from the on-premise Active Directory into Azure AD.  Reason being was the built-in Administrator account was mailbox enabled, and there was a requirement to migrate the mailbox to Exchange Online (Office 365)

Problem

Azure AD Connect was installed and configure, successfully synchronized all user accounts and groups into Azure AD, with the exception of the built-in Administrator account.  There were no errors to indicate why the account would not synchronize.

This issue is described here

“You don’t receive an error message, and directory synchronization seems to be completed. However, some objects or attributes aren’t updated as expected”

Cause

The built-in administrator account has an attribute of “isCriticalSystemObject” set to True.  This can be seen in Active Directory Users and Computers

This attribute matches an exclusion in the Azure AD Connect synchronization rules.  This can be seen here


Solution

You might be tempted to edit the rules from the Azure AD Connect Synchronization Rules Editor so that the Azure AD Connect will not filter the objects whose isCriticalSystemObject being set to true during the synchronization.  The specific rule is the “In from AD – User Join” sync rule

Don’t do this.

If the goal is to migrate the mailbox of the built-in administrator account from on-premises to Exchange Online, then use the following approach:


  1. Create a new account in active directory, and allow to synchronize to Azure AD
  2. Disable the administrator mailbox

3. Reconnect the disabled administrator mailbox to the new user account

4. Migrate the new user account mailbox

Azure AD Connect fails – “The user name or password is incorrect” when adding a second Active Directory Forest

I came across this issue recently and wanted to shared my experience

Environment

The organization has the following configuration

  1. Office 365 tenant
  2. Azure AD Connect configured and synchronizing Active Directory Forest A

Requirement

  1. Synchronize Active Directory Forest B into the same Office 365 tenant

As per the supported topologies for Azure AD Connect here this can be achieved using the same instance of Azure AD Connect.  No forest trust required, but some pre-req’s are required as outlined here including Firewall ports (listed here) , DNS Name resolution (using a Conditional Forwarder -see discussion here) and an account in Forest B with Enterprise Admins permissions.

Problem

The problem I ran into was that even after having all the pre-req’s in place, when I tried to add Forest B to the configured directories, by clicking on “Add Directory” and entering the Enterprise Admin credentials for Forest B using the FQDN

ADC1

I would get the following error:  “The username or password is incorrect”

ADC2

The following error is logged in the trace file in C:\ProgramData\AADConnect

[ERROR] Caught exception while retrieving forest FQDN.  Try using FQDNs for all forest and domain names.

Exception Data (Raw): System.Security.Authentication.AuthenticationException: The user name or password is incorrect.

—> System.Runtime.InteropServices.COMException: The user name or password is incorrect.

Solution

A number of troubleshooting steps were carried out including

  • Verifying required firewall ports were in place
  • Verifying DNS name resolution
  • Verifying the account being used was and enterprise admin

The solution in the end I found here and it was not what I expected.

Before clicking “Add Directory”, replace the default FOREST A with the new FOREST B.  Then click “Add Directory” and enter the details for an Enterprise Admin in Forest B

ADC3

Click OK and Forest B added successfully

ADC4

Office 365 Mailbox Migration Planning Script

Every user mailbox in Exchange Online requires an Office 365 license to be assigned to the user.  Often when migrating from Exchange On-premises, there are more user mailboxes than actual users, and more importantly, more user mailboxes than Office 365 licenses.  In this scenario, a number of options can be considered including:

  1. Migrate user mailbox (requires an Office 365 license)
  2. Decommission user mailbox (redundant)
  3. Convert user mailbox to shared mailbox and migrate (no Office 365 license required)

The following script combines the output from Get-Mailbox and Get-MailboxStatistics against all mailboxes into a CSV file to help make a more informed decision about what to do with the excess of mailboxes in an on-premises environment.  Information captured includes:

  1. Display Name
  2. Primary SMTP Address
  3. Account Disabled
  4. Is Mailbox Enabled
  5. Is Shared
  6. Is Resource
  7. Is root Public Folder Mailbox
  8. Organization Unit
  9. Last Logon Time
  10. Total Item Size

You can download the script from the Technet Gallery here

1

Run the script from the Exchange Management Shell (EMS).  Once complete, I usually convert the CSV to an Excel file as follows so I can filter on the different attributes / fields

  1. Open the CSV file using Microsoft Excel
  2. Highlight / select all the rows and columns with data, select the “Insert” Tab, click on “Table”

2

3. Make sure to tick “My table has headers”, the click OK

3

4. Now you have an excel spreadsheet, in table format with filters, with detailed information about all your mailboxes

4

How to enable, verify and test Litigation Hold in Office 365 – Step by Step

How to enable, verify and test Litigation Hold in Office 365 – Step by Step

In this blog post, I’ll demonstrate step by step how to enable, verify and test litigation hold in Office 365.  I’ll be focusing specifically on the Exchange Online workload.

  1.  Enabled Litigation Hold

You can enable litigation hold for a mailbox by running the following command from the Exchange Online shell (note:  steps to connect PowerShell to Exchange Online can be found here)

Set-Mailbox -identity o365test1@domain.ie -LitigationHoldEnabled $true

lit1

You can enable litigation hold for all users using the following command

Get-Mailbox -RecipientTypeDetails UserMailbox -Filter {PersistedCapabilities -eq “BPOS_S_Enterprise” -and LitigationHoldEnabled -ne $true}

If you want to automate the process, so that when new mailboxes are created they are automatically enabled for litigation hold, please see this blog from Vasil Michev.

2.  Verify Litigation Hold is enabled

To verify Litigation hold is enabled, run the following command

Get-Mailbox -identity o365test1@domain.ie |fl Identity, LitigationHold*

lit2

3.  How to test litigation hold

In the next steps we are going to delete an email so that it cannot be retrieved by the end users in Outlook, and then as an admin perform a search in the Office 365 portal to retrieve the email.

When a user deletes an item, it goes to the deleted items folder, where it can be recovered by the end user.

lit3

lit4

If the item is emptied / deleted from the “Deleted items” folder,

lit5

it goes into the “recoverable items”, where it can still be retrieved by the end user

Note:  14 days retention period for items removed from the Deleted Items folder, after which they cannot be retrieved by the end user. (Details here).

lit6

Once the item is removed from the Deleted Items folder (either automatically by Office 365 after 14 days, or manually by the end user choosing “Purge Selected Items”), it is no longer retrievable by the end user

lit7

If the mailbox is on litigation hold, the item can be retrieved by an Office 365 Administrator.  If the mailbox is not on litigation hold, the item cannot be retrieved.

Next, we will use Office 365 e-Discovery search to retrieve an item that has been deleted from the Delete Items folder, for a mailbox that is on litigation hold

Log into the Office 365 portal (https://portal.office.com) with an account that has a minimum of E-Discovery Manager permissions and navigate to the Security & Compliance admin centre

Note:  E-Discovery Manager permissions are set here

lit8

Navigate to the Security & Compliance admin centre

lit9

Navigate to Search & Investigation and choose “Content Search”

lit10

Choose “New Search”

lit11

Under Locations > Specific locations click Modify

lit12

For “Exchange Email”, select “Choose users”

lit13

Search for required user

lit14

In Keywords, add a “condition” to filter the search for specific details about the email to be retrieved.  Then click Save & Run

lit15

lit16

Enter a description for the Search

lit17

The results show the mail item to be retrieved

lit18

There are a few options here as to how the email item is recovered into the mailbox

  1. Export to EML file
  2. Export to PST file


Export to EML File

For single email items, you can choose “Download Original Item”.  This will allow you to save the email as an .EML file

lit19

The file can then be open on a client that has Outlook installed

lit20

lit21

And saved back into the mailbox using the “Move” option

lit22

lit23

Export to PST file

For recovery of many items, exporting to PST file might be a better option

From the results preview, choose More > Export Results

lit24

Choose export options and then select EXPORT

lit25

Click on the EXPORT tab, copy the export key, and then select “Download Results”

lit26

Click to install the Microsoft Office 365 eDiscovery Export Tool

lit27

Paste the export key and choose a download location, click start

lit28

lit29

When complete, a pst file is created

lit30

Finally, this can then be opened using outlook and / or imported into the mailbox

lit31

That’s all for now, hope you found it useful.

Troubleshooting the Office 365 Hybrid Configuration Wizard

In this blog post I want to share some tips for identifying issues when running the Office 365 Hybrid Configuration Wizard (HCW), available here .

Specifically,

  1. Where to find the Hybrid Configuration Wizard logs
  2. How to identify network related issues

In my experience, network relates issues are the most common cause of HCW failures, and that is where this blog post will focus.   Most corporate networks have firewall and / or proxy restrictions in place.  There are very specific network requirements for connectivity to Office 365 as detailed here .

There is usually a separate network team responsible for implementing the firewall and proxy rules required.   It can be time consuming and frustrating going back and forth between different teams when troubleshooting issues.  This post will demonstrate how to get some visibility of the what’s going on when the HCW is running (in particular on the network side), so that when you engage with the other teams (network / security etc) you have some evidence to back up your suspicions.

Where to find the Hybrid Configuration Wizard logs

The HCW writes a very detailed log which is very useful for troubleshooting.  Jetze Mellema explains here where you can find the log.   For example, here is the location of my HCW log from a recent deployment

C:\Users\jackson_s_admin\AppData\Roaming\Microsoft\Exchange Hybrid Configuration

hcw1

This log provides very detailed information and is a good place to start when troubleshooting.  In some cases, it can be very clear where the problem is.  In the example below, there is a problem accessing the office 365 URL’s via the internet proxy

hcw2

In other cases, we can see errors in the log, (even though in this case the GUI did not show any errors), but its not exactly clear what the cause is.

hcw3

2018.04.24 13:34:43.206 *ERROR* 10277 [Client=UX, Activity=Domain Ownership, Session=OnPremises, Cmdlet=Set-FederatedOrganizationIdentifier, Thread=12] FINISH Time=1341.1ms Results=PowerShell failed to invoke ‘Set-FederatedOrganizationIdentifier’: An error occurred while attempting to provision Exchange to the Partner STS.  Detailed Information “An error occurred accessing Windows Live. Detailed information: “Unable to connect to the remote server”.”.

Looking at the details of this error for example, I have some clue to the cause – Error accessing Windows Live.  My suspicion at this point is network / proxy.  But how can I prove this before engaging with the network support team?  …. By running a network trace and analysing the results (as described next)!


How to identify network related issues

There are lots of tools and different ways to identify network related issues.  Detailed below is just one simple approach (but definitely not the only one)

On your Hybrid server, open PowerShell (or a command prompt) and run the following command to start a network trace


netsh trace start persistent=yes capture=yes tracefile=c:\temp\HCW_Trace.etl


hcw4

Next, recreate the issue you are having with the Office 365 Hybrid Configuration Wizard (HCW).  In this example, the HCW was failing to connect to outlook.office365.com

hcw5

Next go back to PowerShell (or a command prompt) and run the following command to stop the network trace

Netsh trace stop

hcw6

Now, there are tools such as Network Monitor that can be used to view the trace file (ETL) as described here .  However, a popular network analyser that I like to use is Wireshark.  But before we can analyse the network trace using Wireshark, we need to convert it from .ETL to .CAP as described here.

Converting trace file (ETL) it into a Wireshark compatible format

On your pc, download and install the Microsoft Message Analyzer from here .  Open the NETTRACE.ETL (created previously) using Microsoft Message Analyzer.

hcw7

Choose FILE > SAVE AS and then select Export to save the file as NETTRACE.CAP

hcw8

Analyze using Wireshark

Download and install Wireshark from here . Open the NETTRACE.CAP file for analysis

hcw9

At this point, we can apply one or more filters to help narrow the information down and search for any errors.  This site has some good tips of applying filters .  In this example, I am going to filter on the HTTP protocol, by typing http into the filter tab

hcw10

In this example I can see that the internet proxy is indeed blocking access to outlook.office365.com, and now I have some evidence to go back to the network team with.

Good luck with your troubleshooting

Outlook client can’t connect to Exchange 2016 – continually prompts for login credentials

Problem

I came across this issue while working on an Exchange Hybrid deployment.  During the testing phase, I successfully migrated mailboxes from Exchange 2010 to Exchange Online.  However, when I migrated a mailbox from Exchange 2010 to Exchange 2016, my Outlook client could not connect to its mailbox and would continually prompt for login credentials

LoginPrompt1

Note:  On my test client, the Exchange namespaces were all pointing to Exchange 2016.

What was interesting was that the Autodiscover process was working, with the Outlook client successfully retrieving its URL’s, as verified using “Test-Email AutoConfiguration”

LoginPrompt2

This indicated that my outlook client was successfully connecting to the autodiscover virtual directory.  My attention turned towards the MAPI virtual directory as I could see 401 errors in the IIS logs.

 Solution

The solution in my case was to configure the authentication settings via IIS on the MAPI front end and back end virtual directories as follows:

LoginPrompt3

LoginPrompt4

After an IISRESET, my Outlook client connected succesfully